Instructions
-
Prepare the Crust:
- Preheat your oven to 350°F (175°C).
- In a medium bowl, combine the graham cracker crumbs, granulated sugar, and melted butter. Mix until the crumbs are evenly moistened.
- Press the mixture firmly and evenly into the bottom of a 9-inch springform pan. You can use the bottom of a glass or a flat measuring cup to help press it down.
- Bake the crust for 8-10 minutes, or until lightly golden.
- Remove from the oven and let cool completely on a wire rack while you prepare the filling. Reduce oven temperature to 325°F (160°C).
-
Prepare the Cheesecake Filling:
- In a large bowl, using an electric mixer on medium speed, beat the softened cream cheese until smooth and creamy, about 2-3 minutes. Make sure there are no lumps.
- Gradually add the granulated sugar, beating until well combined and fluffy.
- Beat in the vanilla extract, heavy cream, and lemon zest (if using).
- Add the eggs one at a time, beating on low speed after each addition just until incorporated. Do not overmix after adding the eggs, as this can introduce too much air and cause cracks.
- Gently fold in the all-purpose flour until just combined.
- Pour the cheesecake filling over the cooled crust in the springform pan.
- Place the springform pan on a baking sheet to catch any potential drips.
- Bake for 50-60 minutes, or until the edges are set but the center still jiggles slightly when gently shaken.
- Turn off the oven, crack the oven door open slightly, and let the cheesecake cool in the oven for 1 hour. This slow cooling helps prevent cracking.
- Remove the cheesecake from the oven and let it cool completely on a wire rack.
- Once completely cool, cover the cheesecake loosely with plastic wrap and refrigerate for at least 4-6 hours, or preferably overnight, to allow it to set fully.
-
Prepare the Fruit Topping:
- While the cheesecake is chilling, prepare all your fresh fruits. Wash all berries thoroughly and pat them dry.
- Hull and slice the strawberries. Peel and slice the kiwis. Pit and thinly slice the peaches or nectarines.
-
Prepare the Fruit Glaze:
- In a small saucepan, combine the apricot jam and water.
- Heat over low heat, stirring constantly, until the jam is melted and smooth.
- Remove from heat and stir in the lemon juice, if using.
- Strain the glaze through a fine-mesh sieve to remove any fruit chunks, creating a smooth, clear glaze. Let it cool slightly but keep it warm enough to be pourable.
-
Assemble the Cheesecake:
- Once the cheesecake is thoroughly chilled and set, carefully remove the sides of the springform pan.
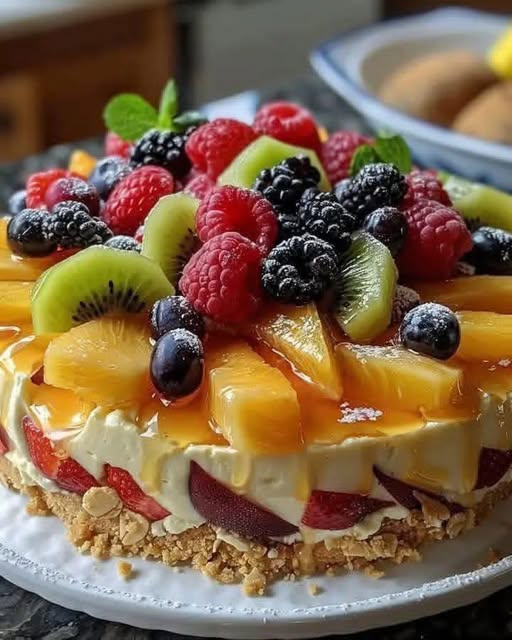
- Arrange the prepared fresh fruits decoratively on top of the cheesecake. You can create concentric circles, a mosaic pattern, or simply pile them beautifully. Be creative!
- Using a pastry brush, gently brush the slightly cooled fruit glaze over all the arranged fruits. This will give them a beautiful shine and help preserve their freshness.
- Garnish with fresh mint leaves, if desired.
- Refrigerate the cheesecake for at least 30 minutes after glazing to allow the glaze to set.
Cooking Tips and Variations
For the smoothest cheesecake filling, ensure your cream cheese is at room temperature. This makes it easier to beat out lumps and incorporate other ingredients evenly. Avoid overmixing the batter, especially after adding the eggs, as too much air can cause the cheesecake to puff up and then crack as it cools. A slow cooling process, first in the oven and then at room temperature, is crucial for preventing cracks. If you don’t have a springform pan, you can use a regular 9-inch pie plate, though removing slices will be a bit more challenging.
Feel free to experiment with different crusts! A shortbread cookie crust or even a crushed vanilla wafer crust would be delicious alternatives. For the filling, you can infuse it with citrus by adding more lemon or orange zest, or a touch of almond extract for a different flavor profile. The fruit topping is entirely customizable; use whatever fresh, seasonal fruits you love most. Mango, grapes, passion fruit, or even thinly sliced apples could be lovely additions. For a richer glaze, you can add a tablespoon of a fruit liqueur like Grand Marnier or Cointreau to the jam mixture. If you prefer a no-bake cheesecake, you can adapt a no-bake filling recipe and use a pre-made crust, then top with fruit and glaze.
Storage and Reheating
This Fruit Topped Cheesecake is best enjoyed fresh, within 2-3 days of preparation. To store, cover the cheesecake loosely with plastic wrap or aluminum foil and refrigerate. The fruit glaze helps to keep the fruit looking fresh, but over time, some fruits may start to soften or weep. For optimal freshness, you can prepare the cheesecake and glaze ahead of time, then assemble and glaze the fruit topping just a few hours before serving.
Reheating is not recommended for this type of cheesecake as it is meant to be served chilled. Warming it up would alter the texture of both the creamy filling and the fresh fruit, potentially making it watery or mushy. Always serve this cheesecake directly from the refrigerator for the best taste and texture experience.
Frequently Asked Questions
How can I prevent my cheesecake from cracking?
Several factors contribute to cheesecake cracking. Ensure your cream cheese is at room temperature for a smooth batter. Do not overmix the batter, especially after adding the eggs, as this incorporates too much air. Baking at a lower temperature and allowing the cheesecake to cool slowly in the oven with the door ajar helps prevent sudden temperature changes that cause cracks. Also, avoid opening the oven door frequently during baking.
Can I make this cheesecake ahead of time?
Absolutely! The cheesecake filling and crust can be made up to 2-3 days in advance and stored in the refrigerator, covered. It’s best to prepare the fruit topping and glaze, and assemble the cheesecake, on the day of serving or no more than 4-6 hours before to ensure the fruit looks its freshest.
What if I don’t have a springform pan?
While a springform pan is ideal for easy removal and presentation, you can use a regular 9-inch pie plate or even a deep-dish cake pan. If using a regular pan, you might want to line the bottom with parchment paper, leaving an overhang on two sides to create “slings” to lift the cheesecake out once it’s chilled and set. This will make serving a bit easier, though the presentation won’t be as clean as with a springform pan.
Can I use frozen fruit for the topping?
It’s highly recommended to use fresh fruit for this recipe. Frozen fruits contain a lot of water, and once thawed, they will release moisture, making the topping watery and potentially affecting the texture of the cheesecake. Fresh fruit provides the best flavor, texture, and visual appeal for this dessert.