Instructions
- Line an 8×4 inch loaf pan or a small baking dish with parchment paper, leaving an overhang on the sides to easily lift out the bars later. This step is crucial for easy removal and cleanup.
- In a medium-sized mixing bowl, combine the unsweetened shredded coconut, chilled coconut cream, erythritol (or monk fruit sweetener), 2 tablespoons of melted coconut oil, vanilla extract, and the pinch of salt.
- Mix all the ingredients thoroughly with a spoon or your hands until well combined. The mixture should be moist enough to hold its shape when pressed together. If it seems too dry, add another tablespoon of coconut cream or melted coconut oil until it reaches the desired consistency.
- Transfer the coconut mixture into the prepared loaf pan. Press the mixture down firmly and evenly using the back of a spoon or your clean hands. It’s important to compact it well to prevent the bars from crumbling later.
- Place the pan in the freezer for at least 30-60 minutes. This step is essential for firming up the coconut mixture, making it easier to cut and dip into chocolate without falling apart. The colder the coconut base, the better it will hold its shape.
- Once the coconut mixture is firm, lift it out of the pan using the parchment paper overhang. Place it on a cutting board.
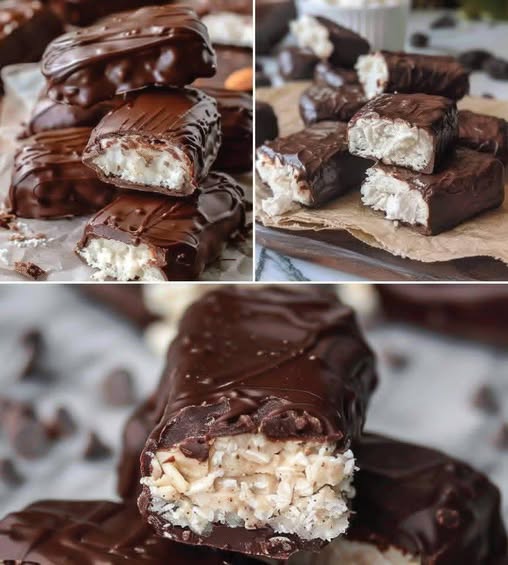
- Using a sharp knife, cut the coconut slab into your desired bar shapes. You can make traditional rectangular bars (about 1-inch wide and 2-3 inches long) or smaller bite-sized squares, depending on your preference. For a classic Bounty look, aim for elongated rectangles.
- Return the cut coconut bars to the freezer on the parchment paper-lined cutting board or a plate. Freeze for another 15-20 minutes while you prepare the chocolate coating. This ensures they are very cold and firm, which helps the chocolate set quickly.
- While the bars are chilling, prepare the chocolate coating. In a microwave-safe bowl, combine the sugar-free dark chocolate (chopped, if using a bar) and 1 tablespoon of coconut oil.
- Melt the chocolate and coconut oil using a double boiler method or in the microwave. If using the microwave, heat in 30-second intervals, stirring well after each interval, until the chocolate is smooth and fully melted. Be careful not to overheat the chocolate, as it can seize.
- Once the chocolate is melted and smooth, remove the super-chilled coconut bars from the freezer.
- Using a fork or a dipping tool, carefully dip each coconut bar into the melted chocolate, ensuring it is fully coated. Allow any excess chocolate to drip off by gently tapping the fork against the side of the bowl.
- Place the chocolate-coated bars back onto the parchment paper-lined cutting board or a separate plate.
- Repeat the dipping process for all the remaining coconut bars. If the chocolate starts to thicken too much, gently rewarm it for a few seconds.
- Optionally, you can sprinkle a little extra shredded coconut or a pinch of sea salt on top of the bars while the chocolate is still wet for extra flair and flavor.
- Once all bars are coated, place them back in the freezer or refrigerator for at least 30 minutes, or until the chocolate coating is completely set and firm.
- Once set, your Homemade Keto Bounty Bars are ready to enjoy!
Cooking Tips and Variations
Achieving the perfect texture and flavor in your Homemade Keto Bounty Bars is all about attention to detail. One crucial tip for the coconut filling is to use full-fat coconut cream that has been well-chilled. When you open a can of full-fat coconut milk that’s been refrigerated overnight, the thick, solid cream will separate from the watery liquid. Scoop out only this thick cream, as it provides the richness and binding power needed for a firm, yet tender, filling. If your filling seems too dry after mixing, don’t hesitate to add a little more melted coconut oil or a spoonful of coconut cream until it holds together well when pressed. Conversely, if it’s too wet, you might need to add a tiny bit more shredded coconut, but be careful not to make it crumbly. The key is a consistency that is moldable and compact. For shaping, firmly pressing the mixture into the pan is critical; this prevents the bars from falling apart when cut and dipped.
When it comes to the chocolate coating, proper melting is essential to avoid a grainy or seized texture. If using a microwave, heat in short bursts (15-30 seconds) and stir thoroughly after each. Overheating can burn the sugar-free chocolate or cause it to seize. The added coconut oil helps to make the chocolate smoother and easier to work with, giving it a glossier finish and a satisfying snap when set. For the best dipping results, ensure your coconut bars are very cold, preferably straight from the freezer. This allows the chocolate to set quickly on contact, reducing drips and creating an even, firm coating. A fork or a dedicated chocolate dipping tool works wonders for submerging and lifting the bars, letting excess chocolate drip off before placing them onto parchment paper. If you find the chocolate thickening during the dipping process, a quick 10-15 second reheat in the microwave will bring it back to a pourable consistency.
There are several delightful variations you can explore to customize your Keto Bounty Bars. For instance, while erythritol or monk fruit are standard keto sweeteners, you could experiment with allulose for a smoother texture and less cooling sensation, adjusting quantities as needed. If you enjoy a hint of mint with your chocolate and coconut, add a few drops of food-grade peppermint extract to either the coconut filling or the melted chocolate. A pinch of sea salt in the coconut filling enhances the overall flavor, balancing the sweetness and bringing out the coconut notes. For an extra layer of texture, finely chopped toasted almonds or pecans could be folded into the coconut filling, or sprinkled on top of the wet chocolate coating before it sets. You could also try a white chocolate keto coating using sugar-free white chocolate chips for a different aesthetic and flavor profile. Don’t be afraid to get creative and make these bars truly your own!
Storage and Reheating
Proper storage is key to maintaining the freshness and deliciousness of your Homemade Keto Bounty Bars. Since they contain coconut cream and coconut oil, which soften at room temperature, these bars are best stored in the refrigerator. Place the set bars in an airtight container, separating layers with parchment paper to prevent them from sticking together. Stored in the refrigerator, they will remain fresh and firm for up to 1-2 weeks. The chocolate coating will stay crisp, and the coconut filling will retain its moist, chewy texture. They are particularly refreshing when enjoyed chilled, especially on a warm day, as the cold enhances the firmness of the chocolate and the creamy texture of the coconut.
For longer-term storage, these keto bounty bars freeze exceptionally well. Arrange the fully set bars in a single layer on a parchment-lined baking sheet and freeze until solid (about 1-2 hours). Once frozen, transfer them to a freezer-safe airtight container or a heavy-duty freezer bag, again, separating layers with parchment paper to prevent sticking. Stored in the freezer, they can last for up to 2-3 months. Freezing them individually first prevents them from clumping into a large block. This makes it convenient to grab just one or two bars whenever a craving strikes, ensuring you always have a keto-friendly treat on hand. When you’re ready to enjoy a frozen bar, simply remove it from the freezer and let it thaw in the refrigerator for about 30 minutes to an hour, or at room temperature for 15-20 minutes, until it reaches your desired consistency. There’s no “reheating” involved with these bars, as they are meant to be enjoyed cold or at cool room temperature.
Frequently Asked Questions
Can I use a different sweetener for the coconut filling?
Yes, you can absolutely use a different keto-friendly sweetener. Erythritol and monk fruit are popular choices due to their low glycemic index and minimal aftertaste. Allulose is another excellent option that provides a very smooth texture and bakes well without crystallizing, though you might need to adjust the quantity as it’s slightly less sweet than erythritol. Stevia can also be used, but start with a very small amount and taste as you go, as it’s much more concentrated and can have a stronger aftertaste for some people. Always taste the coconut mixture before chilling to ensure the sweetness level is to your liking.
Why did my chocolate seize when melting?
Chocolate seizing (becoming thick, grainy, and unworkable) usually happens for a few reasons. The most common culprit is introducing even a tiny drop of water or steam into the melting chocolate. Ensure your bowl and any utensils are completely dry. Overheating the chocolate can also cause it to seize or burn, especially with sugar-free varieties. When melting in the microwave, use short intervals and stir frequently. If using a double boiler, make sure the bottom of your chocolate bowl does not touch the simmering water, and that no steam escapes into the chocolate. If your chocolate does seize, sometimes you can rescue it by stirring in a tablespoon or two of very hot water or melted coconut oil, but it might affect the final texture and glossiness.
How can I make the bars firmer?
To ensure your bars are extra firm, especially the coconut filling, there are a few tricks. First, make sure you’re using the thick, solid coconut cream from a chilled can of full-fat coconut milk, not the watery part. Second, thoroughly compact the coconut mixture into the pan; the firmer you press it, the less likely it is to crumble. Third, and most importantly, allow ample chilling time. Freezing the coconut slab for at least an hour before cutting, and then freezing the cut bars again before dipping, is crucial. The colder and firmer the coconut base, the better it will hold its shape during the dipping process and once set. Using slightly more coconut oil in the filling (an extra tablespoon) can also contribute to a firmer texture when chilled.
Can I make these bars without coconut oil in the chocolate?
While you can melt sugar-free chocolate without additional coconut oil, adding it is highly recommended for these bars. The coconut oil serves several important purposes: it makes the chocolate smoother and more fluid, which results in a thinner, more even coating on the bars. It also helps the chocolate set with a beautiful glossy finish and adds to the satisfying “snap” when you bite into the bar. Without it, the chocolate might be thicker and harder to work with, leading to a much thicker coating that could potentially crack more easily. If you prefer not to use coconut oil, you could try a tiny bit of cocoa butter, but coconut oil complements the coconut flavor of the filling beautifully.