Instructions
- In a large mixing bowl, combine the all-purpose flour, instant dry yeast, fine sea salt, and granulated sugar (if using). Whisk them together thoroughly to ensure the yeast and salt are evenly distributed throughout the flour. This step is crucial for consistent leavening and flavor.
- Create a well in the center of the dry ingredients. Pour in the warm water and the 1 tablespoon of olive oil. Using a wooden spoon or a sturdy spatula, mix the ingredients together until a shaggy, sticky dough forms. There’s no need for intense mixing or kneading at this stage; just ensure all the flour is hydrated and no dry pockets remain.
- Once the dough is combined, cover the bowl tightly with plastic wrap or a clean kitchen towel. Place the bowl in a warm spot in your kitchen and let it rest for a minimum of 30 minutes, or up to 1 hour. During this time, the yeast will work its magic, and the dough will become noticeably softer, more elastic, and slightly puffed, even without kneading. This resting period is key to developing the gluten structure.
- After the resting period, lightly flour a clean work surface. Gently transfer the dough from the bowl onto the floured surface. The dough will be soft and a bit sticky, so use a little flour on your hands if needed. Avoid overworking the dough; just handle it gently.
- Divide the dough into 6-8 equal portions. You can do this by eye or use a kitchen scale for more precise measurements. Each portion will be roughly the size of a golf ball or slightly larger.
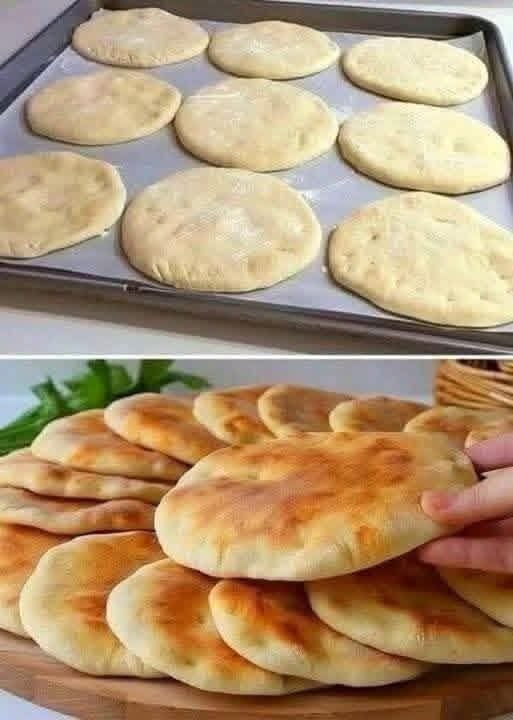
- Take one portion of dough and gently shape it into a ball by tucking the edges underneath. Then, using a rolling pin or your hands, flatten the ball into a round disc, about 6-8 inches (15-20 cm) in diameter and about ⅛ to ¼ inch (3-6 mm) thick. Aim for an even thickness to ensure uniform cooking. Repeat this process with the remaining dough portions, dusting with flour as needed to prevent sticking. Place the shaped flatbreads on a lightly floured surface or a piece of parchment paper while you work on the rest.
- Heat a large non-stick skillet or cast-iron pan over medium-high heat. Add about ½ teaspoon of olive oil or vegetable oil to the pan and swirl to coat the bottom. You want the pan to be hot but not smoking.
- Carefully place one flatbread into the hot pan. Cook for 1-2 minutes per side, or until golden brown spots appear and the flatbread begins to puff up. The puffing is a sign that the steam is trapped inside, creating those lovely airy pockets. You might need to adjust the heat slightly to prevent burning.
- Once cooked, remove the flatbread from the pan and place it on a plate or a wire rack. Cover it with a clean kitchen towel to keep it warm and soft while you cook the remaining flatbreads. This helps to retain moisture and prevent them from becoming dry.
- Repeat the cooking process with the remaining dough, adding a little more oil to the pan between each flatbread if necessary. Serve the flatbreads immediately, warm and fresh, with your favorite dips, spreads, or fillings. Enjoy the incredible taste of homemade bread made with such minimal effort!
Cooking Tips and Variations
Achieving the perfect easy flatbread is all about a few key techniques and knowing how to adapt. For the best puff and texture, ensure your pan is adequately hot before adding the dough. A medium-high heat is usually ideal; if it’s too low, the bread will dry out before it browns and puffs, and if it’s too high, it’ll burn before cooking through. Don’t be afraid to adjust the heat as you cook. Another crucial tip is to avoid overcrowding the pan; cook one or two flatbreads at a time, depending on your pan size, to maintain consistent heat and allow even cooking. Flipping the bread once or twice during cooking is usually sufficient to get that beautiful golden-brown color and characteristic puff. If your flatbreads aren’t puffing much, don’t worry, they’ll still be delicious! It often means your dough needed a little more resting time or your pan wasn’t quite hot enough. Keep practicing, and you’ll get the hang of it.
The beauty of this simple recipe lies in its versatility for variations. To add an herbaceous twist, finely chop fresh rosemary, thyme, or oregano and mix it into the dry ingredients along with the flour. For a savory garlic flavor, add a teaspoon of garlic powder to the dough or brush the cooked flatbreads with melted butter (if not strictly avoiding) or olive oil infused with minced garlic and fresh parsley. You can also experiment with different flours; while all-purpose flour works wonderfully, a small percentage of whole wheat flour (about ¼ cup) can add a nuttier flavor and more fiber, though it might make the dough slightly denser. For a touch of spice, a pinch of red pepper flakes or a sprinkle of za’atar mixed into the dough or sprinkled on top before cooking can elevate the flavor profile. These flatbreads also make fantastic mini pizzas; simply spread with tomato sauce, sprinkle with cheese and your favorite toppings, and bake in a hot oven or under a broiler until golden and bubbly.
Storage and Reheating
These homemade flatbreads are best enjoyed fresh and warm, straight from the pan. However, if you have leftovers, they store quite well and can be reheated easily. To store, allow the flatbreads to cool completely to room temperature. Once cool, stack them and place them in an airtight container or a resealable plastic bag. They will keep fresh at room temperature for up to 2-3 days. For longer storage, you can refrigerate them for up to 5 days. Beyond that, freezing is an excellent option. To freeze, stack the cooled flatbreads with a piece of parchment paper between each one to prevent sticking, then wrap the stack tightly in plastic wrap and place it in a freezer-safe bag or container. They can be frozen for up to 2-3 months.
Reheating these flatbreads is simple and brings them back to their soft, pliable best. From room temperature or refrigerated, you can quickly warm them in a dry non-stick skillet over medium heat for about 30 seconds to 1 minute per side, until heated through and slightly softened. You can also pop them in a toaster oven for a minute or two, or microwave them for 10-20 seconds for a very quick reheat, though the microwave might make them a little chewier rather than crispy. If reheating from frozen, there’s no need to thaw completely. You can place the frozen flatbreads directly into a hot, dry skillet over medium heat, flipping occasionally, until they are soft and warm, which usually takes about 2-3 minutes. Alternatively, you can bake them in a preheated oven at 350°F (175°C) for 5-7 minutes, or until heated through. Always cover them with a damp paper towel or foil if baking to prevent them from drying out. They’ll be almost as good as fresh!
Frequently Asked Questions
Can I make the dough ahead of time?
Absolutely! This dough is quite forgiving. After mixing, you can cover the bowl tightly with plastic wrap and refrigerate it for up to 24 hours. The cold temperature will slow down the yeast activity, allowing for a longer, slower proof which can actually develop more flavor. When you’re ready to cook, take the dough out of the fridge about 30 minutes to an hour before you plan to shape and cook it, allowing it to come closer to room temperature and for the yeast to become active again.
Why didn’t my flatbreads puff up?
There are a few common reasons why flatbreads might not puff. The most frequent culprits are the pan not being hot enough, or the dough not being rolled out to an even thickness. Ensure your skillet is heated to medium-high before adding the dough; a hot pan creates instant steam that gets trapped and causes the puff. Also, make sure your dough is rolled evenly, without very thin or very thick spots, as this helps the steam distribute evenly. Finally, ensure your yeast is fresh and active – if your dough didn’t show much rise during the resting period, it might be due to inactive yeast or water that was too hot or too cold.
What kind of flour works best for this recipe?
All-purpose flour is perfect for this recipe, yielding a soft and pliable flatbread. You can also use bread flour if you prefer a slightly chewier texture, as it has a higher protein content. While we recommend starting with all-purpose for ease and consistency, if you’re feeling adventurous, you could substitute a small portion (up to ¼ cup) with whole wheat flour for a nuttier flavor and added fiber, but be aware it might make the dough slightly denser and require a tiny bit more water.
Can I bake these in the oven instead of a pan?
Yes, you can! For oven baking, preheat your oven to a high temperature, around 450-500°F (230-260°C), with a baking sheet or pizza stone inside to get it very hot. Carefully place the shaped flatbreads onto the hot baking sheet or stone. Bake for 3-5 minutes, or until they puff up and the edges are golden brown. This method often results in a slightly crispier exterior and a more even puff than pan-frying, but it will still be delicious.