Instructions
- Preheat your oven to 400°F (200°C). Lightly grease a 9×13 inch baking dish with a little olive oil.
- Pat the chicken breasts dry thoroughly with paper towels. This step is crucial for achieving that beautiful golden-brown sear and allowing the glaze to adhere properly.
- Place the chicken breasts between two pieces of plastic wrap or parchment paper. Using a meat mallet or a heavy rolling pin, gently pound the chicken breasts to an even thickness of about 3/4 to 1 inch. This ensures even cooking and helps tenderize the meat.
- In a medium bowl, whisk together the olive oil, honey (or maple syrup), Dijon mustard, apple cider vinegar, garlic powder, onion powder, smoked paprika, black pepper, and salt. This will form your flavorful glaze.
- Add the chopped fresh rosemary to the glaze mixture and stir to combine.
- Place the pounded chicken breasts into the prepared baking dish.
- Pour about two-thirds of the glaze mixture evenly over the chicken breasts, ensuring they are well coated. Reserve the remaining glaze for basting.
- Pour the chicken broth or water into the bottom of the baking dish around the chicken. This adds moisture to the oven environment and prevents the chicken from drying out.
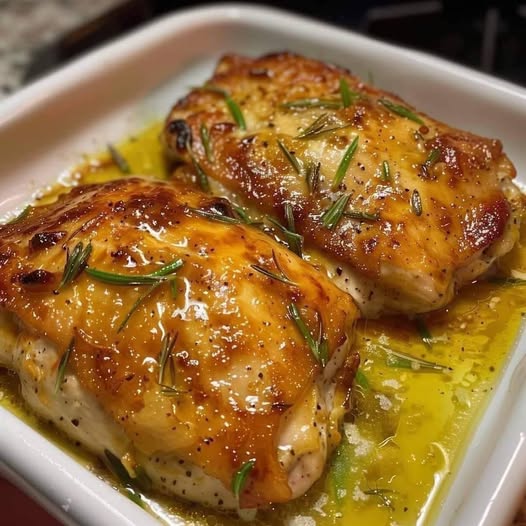
- Bake for 15-20 minutes, or until the chicken reaches an internal temperature of 160°F (71°C) when measured with a meat thermometer at its thickest part. The chicken should be golden brown and look similar to the image provided.
- Remove the baking dish from the oven. Brush the remaining reserved glaze over the chicken breasts.
- Return the chicken to the oven and bake for another 5-10 minutes, or until the internal temperature reaches 165°F (74°C) and the glaze is slightly caramelized and sticky. Keep a close eye on it during this final stage to prevent overcooking.
- Once cooked, remove the chicken from the oven. Loosely tent the baking dish with aluminum foil and let the chicken rest for 5-10 minutes before slicing and serving. This resting period is vital, as it allows the juices to redistribute throughout the meat, resulting in incredibly tender and moist chicken.
- Garnish with extra fresh rosemary sprigs before serving.
Cooking Tips and Variations
Tips for Best Results:
- Don’t Skip the Pounding: Pounding the chicken to an even thickness is key to ensuring it cooks uniformly and doesn’t dry out in thinner sections while thicker parts are still cooking. It also helps tenderize the meat.
- Pat Dry Thoroughly: Moisture on the surface of the chicken will steam rather than sear, hindering the development of that beautiful golden crust and preventing the glaze from adhering properly.
- Use a Meat Thermometer: This is your best friend for perfectly cooked chicken. Overcooked chicken breasts are notoriously dry. Aim for 160°F (71°C) before the final glaze application, and 165°F (74°C) as the final internal temperature. The temperature will rise a few degrees as it rests.
- Rest Your Chicken: This cannot be stressed enough! Resting allows the muscle fibers to relax and reabsorb the juices, preventing them from running out when you slice the chicken. This step guarantees maximum juiciness.
- Fresh Herbs Make a Difference: While dried rosemary can be used in a pinch, fresh rosemary provides a superior aroma and flavor that truly elevates this dish.
- Adjust Sweetness: If you prefer a less sweet glaze, you can slightly reduce the amount of honey or maple syrup. Conversely, for a sweeter, stickier glaze, a touch more can be added.
Variations:
- Spicy Kick: Add a pinch of cayenne pepper or red pepper flakes to the glaze for a subtle heat.
- Citrus Brightness: Incorporate 1 tablespoon of fresh lemon juice or orange juice into the glaze for a zesty twist.
- Herb Swap: While rosemary is fantastic, feel free to experiment with other fresh herbs like thyme, oregano, or a mix of Italian herbs.
- Garlic Lover’s Dream: Mince 2-3 cloves of fresh garlic and add them to the glaze for an even more intense garlic flavor.
- Balsamic Glaze: Replace the apple cider vinegar with balsamic vinegar and add a teaspoon of brown sugar for a richer, tangier glaze.
- Creamy Finish: After the chicken is cooked, remove it from the pan. Whisk a tablespoon of heavy cream into the pan juices over low heat on the stovetop until slightly thickened, then pour over the chicken before serving.
- Chicken Thighs: This recipe works wonderfully with boneless, skinless chicken thighs as well. They tend to be more forgiving and naturally juicier, but adjust cooking time as needed, typically a few minutes longer.
- Grilling Option: For a smoky flavor, marinate the chicken in the glaze for at least 30 minutes, then grill over medium heat, basting occasionally with the remaining glaze, until cooked through.
- Sheet Pan Meal: Add chopped vegetables like asparagus, bell peppers, or broccoli florets to the baking dish alongside the chicken during the last 15-20 minutes of cooking for a complete meal.
Storage and Reheating
Storage:
Leftover Melt-in-Your-Mouth Chicken should be stored in an airtight container in the refrigerator within two hours of cooking. Properly stored, it will remain fresh for 3-4 days. For longer storage, you can freeze the cooked chicken. Allow it to cool completely, then wrap individual chicken breasts tightly in plastic wrap and then in aluminum foil, or place them in a freezer-safe bag or container. It can be frozen for up to 2-3 months. Thaw frozen chicken overnight in the refrigerator before reheating.
Reheating:
To maintain the chicken’s tenderness and juiciness, reheating it gently is key. Avoid high heat or extended microwave times, which can dry it out.
- Oven (Recommended for best results): Preheat your oven to 300°F (150°C). Place the leftover chicken breasts in an oven-safe dish with a tablespoon or two of chicken broth or water to help maintain moisture. Cover the dish loosely with aluminum foil. Heat for 15-20 minutes, or until warmed through.
- Stovetop: Slice the chicken into thinner pieces. Heat a non-stick skillet over medium-low heat with a small amount of olive oil or butter. Add the chicken slices and a splash of chicken broth or water. Cover and cook for 5-7 minutes, flipping once, until heated through.
- Microwave (Use with caution): While convenient, the microwave can easily dry out chicken. Place the chicken on a microwave-safe plate with a splash of water or broth. Cover with a microwave-safe lid or damp paper towel. Heat on 50-70% power in 30-60 second intervals, checking and flipping until just warmed through. Do not overheat.
Frequently Asked Questions
Why is my chicken breast always dry?
Chicken breasts are lean cuts of meat, making them prone to drying out if overcooked. The key to juicy chicken is not just cooking it to the right internal temperature (165°F or 74°C), but also ensuring even thickness by pounding, and allowing it to rest after cooking. This recipe uses a tenderizing glaze and a little broth in the pan to create a moist environment, further preventing dryness.
Can I prepare the glaze ahead of time?
Absolutely! The glaze can be prepared up to 2-3 days in advance and stored in an airtight container in the refrigerator. In fact, making it ahead allows the flavors to meld even further, potentially enhancing the overall taste of the dish. Stir well before using.
What are some good side dishes to serve with this chicken?
This versatile chicken pairs wonderfully with a variety of sides. For a light meal, consider a fresh green salad with a vinaigrette dressing, steamed green beans, or roasted asparagus. For something more substantial, creamy mashed potatoes, fluffy rice pilaf, quinoa, or roasted sweet potatoes would be excellent choices. A crusty bread to soak up the delicious pan juices is also highly recommended!
Can I use bone-in, skin-on chicken for this recipe?
While the recipe is designed for boneless, skinless chicken breasts, you can adapt it for bone-in, skin-on chicken pieces like thighs or even breasts. However, the cooking time will be longer (typically 30-45 minutes for bone-in pieces), and you may need to adjust the oven temperature slightly lower to ensure the chicken cooks through without burning the skin. The skin will also absorb much of the glaze, creating a different texture, but still delicious. Always ensure the internal temperature reaches 165°F (74°C).