Instructions
- In the bowl of a stand mixer fitted with the dough hook attachment, combine the warm milk, a pinch of granulated sugar, and the active dry yeast. Stir gently and let it sit for 5-10 minutes, or until the mixture becomes foamy, indicating the yeast is active.
- Add the remaining ¼ cup (50g) granulated sugar, the whole egg, egg yolk, and salt to the yeast mixture. Mix on low speed until just combined.
- Gradually add the all-purpose flour, one cup at a time, mixing on low speed until a shaggy dough forms. Increase the speed to medium-low and knead for 5 minutes.
- With the mixer still running on medium-low, add the softened butter, one piece at a time, allowing each piece to be mostly incorporated before adding the next. This process will take about 5-7 minutes. The dough will look very soft and sticky at first, but continue kneading.
- Increase the mixer speed to medium and knead for another 10-15 minutes, or until the dough is smooth, elastic, and pulls away from the sides of the bowl. It should be slightly sticky but manageable. To check for proper kneading, perform the “windowpane test”: pinch off a small piece of dough and gently stretch it. If you can stretch it thin enough to see light through it without tearing, it’s ready.
- Lightly grease a large bowl with a little oil. Transfer the dough to the greased bowl, turning it once to coat the entire surface. Cover the bowl tightly with plastic wrap or a clean kitchen towel.
- Place the bowl in a warm, draft-free place and let the dough rise for 1.5 to 2 hours, or until it has doubled in size. This is the first proof.
- Once the dough has doubled, gently punch it down to release the air. Turn the dough out onto a lightly floured surface.
- Divide the dough into 12 equal pieces. For best results, use a kitchen scale to ensure each piece weighs approximately 65-70g.
- Shape each piece of dough into a tight, smooth ball. To do this, cup your hand over the dough piece and roll it against the counter in a circular motion, applying gentle pressure to create tension on the surface.
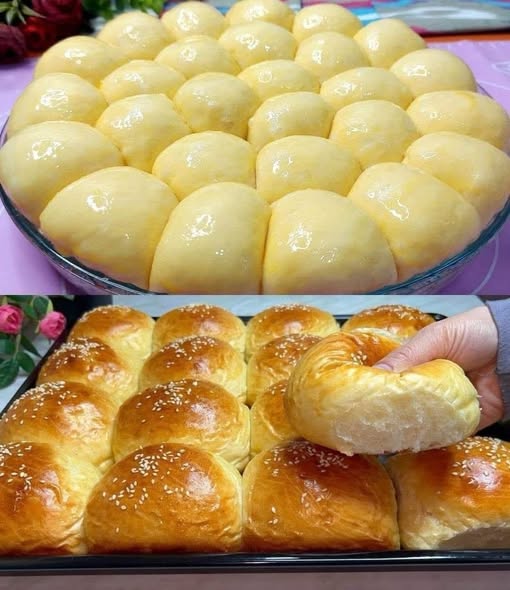
- Arrange the shaped dough balls in a greased 9×13 inch baking dish or on a parchment-lined baking sheet, leaving a small space between each roll. They will expand as they rise and bake.
- Cover the baking dish or sheet loosely with plastic wrap or a clean kitchen towel. Let the rolls rise again in a warm, draft-free place for another 45-60 minutes, or until they are visibly puffy and nearly doubled in size. This is the second proof.
- While the rolls are undergoing their second rise, preheat your oven to 375°F (190°C).
- Prepare the egg wash: In a small bowl, whisk together the remaining large egg with 1 tablespoon of water or milk.
- Once the rolls have finished their second rise, gently brush the tops of each roll with the egg wash. Be careful not to deflate them. If desired, sprinkle sesame seeds evenly over the tops of the rolls.
- Bake for 20-25 minutes, or until the rolls are golden brown on top and sound hollow when tapped on the bottom. If the tops are browning too quickly, you can loosely tent them with aluminum foil for the last few minutes of baking.
- Remove the rolls from the oven and, if baking in a dish, immediately transfer them to a wire rack to cool slightly. If baked on a sheet, simply let them cool on the rack.
- Serve warm or at room temperature. Enjoy your homemade Milk Brioche Rolls!
Cooking Tips and Variations
For the most tender and flavorful brioche, always start with room temperature ingredients, especially the eggs, milk, and butter. This helps them incorporate more smoothly into the dough and ensures a consistent dough temperature, which is crucial for yeast activity. When warming the milk, be careful not to overheat it, as too hot liquid can kill the yeast. A temperature between 105-115°F (40-46°C) is ideal.
Don’t be afraid of sticky dough during the kneading process. Brioche dough is naturally soft and sticky due to its high fat and moisture content. Resist the urge to add too much extra flour, as this will result in dry, dense rolls. A well-kneaded brioche dough will eventually become smooth and elastic, pulling away from the sides of the bowl, even if it remains slightly tacky to the touch. The windowpane test is your best friend here, indicating optimal gluten development.
Creating a warm, draft-free environment for proofing is essential for a good rise. You can achieve this by placing the covered bowl in a slightly warmed, turned-off oven, or simply in a sunny spot in your kitchen. Patience during the rising times is key; don’t rush the process. A slow, steady rise develops better flavor and texture. For an extra rich flavor and incredibly soft crust, brush the baked rolls with a little melted butter immediately after they come out of the oven.
Variations:
- Sweet Chocolate Chip Brioche: Fold in 1 cup of chocolate chips (milk, dark, or white) during the last minute of kneading.
- Cinnamon Sugar Swirls: After the first rise, roll the dough into a large rectangle. Spread with softened butter, sprinkle generously with cinnamon sugar, then roll up tightly and slice into individual rolls before the second rise.
- Savory Herb & Cheese Rolls: Incorporate 2 tablespoons of finely chopped fresh herbs (like rosemary, thyme, or chives) and ½ cup of grated Parmesan or Gruyere cheese into the dough during the last few minutes of kneading. Skip the sesame seeds and egg wash, or use the egg wash and sprinkle with more cheese instead.
- Garlic Butter Brioche: After baking, brush the warm rolls with a mixture of melted butter, minced garlic, and fresh parsley.
Storage and Reheating
To keep your milk brioche rolls fresh and soft, store them in an airtight container or a resealable plastic bag at room temperature for up to 2-3 days. Avoid refrigerating, as this can dry out bread and make it stale faster. If you live in a humid environment or want to extend their shelf life, you can freeze them.
For longer storage, once the rolls have cooled completely, place them in a freezer-safe bag or airtight container. They can be frozen for up to 2-3 months. To enjoy frozen rolls, simply remove them from the freezer and let them thaw at room temperature for a few hours, or reheat them directly from frozen.
To reheat, you have a few options depending on your preference:
- Oven: Preheat your oven to 350°F (175°C). Place the rolls on a baking sheet and heat for 5-10 minutes, or until warmed through and soft. If reheating from frozen, this might take 10-15 minutes.
- Microwave: For a quick reheat, wrap an individual roll in a damp paper towel and microwave for 10-20 seconds. Be careful not to over-microwave, as this can make them tough.
- Toaster Oven: A toaster oven works well for warming a few rolls at a time, using similar temperatures and times as a regular oven.
Reheating will bring back much of their original softness and warmth, making them almost as good as freshly baked.
Frequently Asked Questions
What makes brioche different from other bread rolls?
Brioche stands out due to its high enrichment with eggs, milk, and a significant amount of butter. This creates a dough that is much richer, softer, and more tender than typical bread rolls, which usually rely on water as their primary liquid and less fat. The extra fat and eggs contribute to its distinctive golden color, fine crumb, and slightly sweet, luxurious flavor.
Can I make this dough ahead of time?
Absolutely! Brioche dough is excellent for making ahead. After the first rise, you can punch down the dough, cover it tightly with plastic wrap, and refrigerate it for up to 24-48 hours. The cold temperature slows down the yeast activity, allowing for a longer fermentation which can enhance flavor. When you’re ready to bake, remove the dough from the refrigerator, let it come to room temperature for about 30-60 minutes, then proceed with shaping the rolls and the second rise as directed in the recipe.
My rolls didn’t rise enough. What went wrong?
Several factors can cause poor rising. The most common culprit is inactive yeast. Ensure your milk is at the correct temperature (105-115°F/40-46°C) – too hot will kill the yeast, too cold won’t activate it. Old or expired yeast will also fail to activate, so always check the expiration date. Other factors could be a drafty or too-cold environment during proofing, or not kneading the dough long enough to develop sufficient gluten structure to trap the gases produced by the yeast.
Why is my brioche dense instead of fluffy?
Density in brioche can often be attributed to either adding too much flour during the kneading process, which makes the dough stiff, or not kneading enough to develop the gluten. Gluten is essential for creating the elastic structure that allows the dough to capture air and become light and fluffy. Another reason could be over-proofing, where the dough rises too much and then collapses, leading to a dense texture, or under-proofing, where it doesn’t have enough time to develop sufficient air pockets.