Instructions
- Prepare the Oreo Crust: In a medium bowl, combine the finely crushed Oreo cookies and melted butter. Mix until the crumbs are evenly moistened. Press the mixture firmly and evenly into the bottom and up the sides of a 9-inch pie plate. You can use the bottom of a glass or your fingers to compact it well. Place the crust in the refrigerator to chill for at least 30 minutes while you prepare the filling.
- Prepare the Chocolate Cheesecake Filling: In a large mixing bowl, using an electric mixer, beat the softened cream cheese on medium speed until smooth and creamy, about 2-3 minutes.
- Add the sifted powdered sugar and sifted cocoa powder to the cream cheese. Beat on low speed until just combined, then increase to medium and beat until fully incorporated and smooth, scraping down the sides of the bowl as needed.
- Stir in the vanilla extract and almond extract (if using).
- In a separate, clean bowl, whip the 1 cup of cold heavy cream until stiff peaks form. Be careful not to over-whip.
- Gently fold the melted and slightly cooled semi-sweet chocolate chips into the cream cheese mixture.
- Then, gently fold the whipped cream into the chocolate cream cheese mixture in two additions, until just combined and no streaks remain. Be careful not to deflate the whipped cream.
- Pour the chocolate cheesecake filling into the chilled Oreo crust and spread it evenly with a spatula. Return the pie to the refrigerator to chill for at least 4-6 hours, or preferably overnight, to allow it to firm up completely.
- Prepare the Chocolate Ganache: Once the pie has chilled sufficiently, prepare the ganache. In a small microwave-safe bowl, heat the 1/2 cup heavy cream until it just begins to simmer (about 60 seconds in most microwaves). Alternatively, heat in a small saucepan over medium heat until simmering.
- Pour the hot cream over the 1/2 cup semi-sweet chocolate chips. Let it sit for 5 minutes without stirring.
- After 5 minutes, whisk gently from the center outwards until the chocolate is completely melted and the ganache is smooth and glossy. Let the ganache cool for about 10-15 minutes until it’s slightly thickened but still pourable.
- Carefully pour the cooled ganache over the top of the chilled cheesecake pie, spreading it gently to the edges. Return the pie to the refrigerator for another 30 minutes to allow the ganache to set slightly.
- Prepare the Chocolate Whipped Cream Topping: In a clean, cold mixing bowl, combine the 1 cup cold heavy cream, 2 tablespoons sifted powdered sugar, 2 tablespoons sifted cocoa powder, and 1/2 teaspoon vanilla extract.
- Whip on high speed until stiff peaks form. Do not over-whip or it will become grainy.
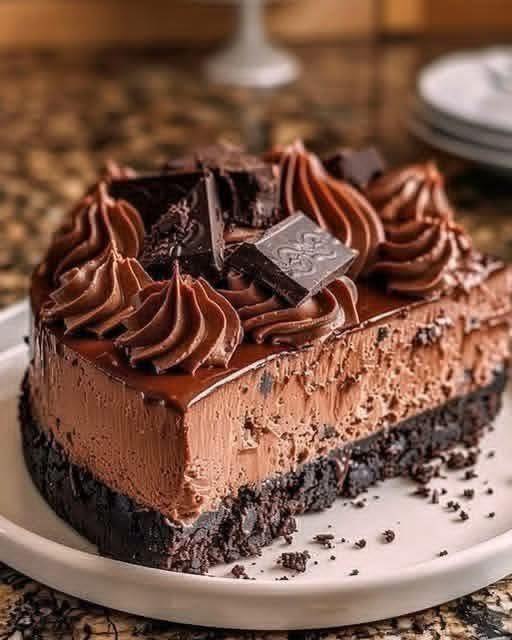
- Decorate and Serve: Once the ganache has set, transfer the chocolate whipped cream to a piping bag fitted with a star tip (or simply use a spoon to dollop it artfully). Pipe or spread the whipped cream around the edge of the pie.
- Garnish generously with chocolate shavings or curls over the whipped cream or the center of the pie.
- Slice and serve immediately. Enjoy your decadent No-Bake Black Forest Cheesecake Pie!
Cooking Tips and Variations
Achieving the perfect No-Bake Black Forest Cheesecake Pie is all about attention to a few key details. For the crust, ensure your Oreo cookies are finely crushed; a food processor works best for this, creating a sand-like consistency that presses together beautifully. If you don’t have one, place them in a Ziploc bag and crush with a rolling pin. When pressing the crust into the pie plate, use the bottom of a flat-bottomed glass or a measuring cup to get a really firm and even base, which prevents crumbling when slicing.
For the cheesecake filling, the most crucial tip is to use room-temperature cream cheese. This ensures a smooth, lump-free filling that incorporates easily with other ingredients. Cold cream cheese will result in a lumpy texture that’s hard to beat smooth. When melting the chocolate for the filling, do so gently, either in a microwave in 30-second intervals (stirring between each) or over a double boiler, to prevent scorching. Let it cool slightly before adding to the cream cheese mixture so it doesn’t melt the other ingredients or cause the filling to seize.
When folding in the whipped cream, do so gently and in stages to maintain as much air as possible, which contributes to the light and airy texture of the cheesecake. Over-mixing at this stage can deflate the cream, leading to a denser filling. The chilling time is non-negotiable; a minimum of 4-6 hours, or ideally overnight, is essential for the cheesecake to fully set and achieve its perfect sliceable consistency. Rushing this step will result in a soft, messy pie.
For the ganache, be sure the cream is hot enough to melt the chocolate chips completely, but don’t boil it. Letting it sit over the chocolate for a few minutes before stirring allows the heat to evenly distribute, resulting in a smooth, glossy finish. If your ganache is too thick, you can gently warm it again over low heat or in short microwave bursts. If it’s too thin, let it cool a bit longer. For the whipped cream topping, ensure both the cream and your mixing bowl/whisk attachment are very cold. You can even chill the bowl for 10-15 minutes beforehand for optimal whipping results.
Variations:
- Cherry Boost: To amplify the Black Forest flavor, spread a thin layer of cherry pie filling or high-quality cherry preserves over the bottom of the Oreo crust before adding the cheesecake filling. You can also mix some chopped maraschino or fresh pitted cherries into the cheesecake filling for bursts of fruit.
- Liqueur Kick: For an adult version, add 1-2 tablespoons of kirsch (cherry brandy) or a good quality cherry liqueur to either the cheesecake filling or the whipped cream for an authentic Black Forest touch.
- Different Crust: While Oreo is classic, you could use crushed chocolate graham crackers or even digestive biscuits mixed with cocoa powder for a slightly different crust flavor.
- White Chocolate Swirl: After pouring the chocolate ganache, drizzle some melted white chocolate over it and swirl gently with a toothpick for a decorative marble effect.
- Nutty Twist: Add 1/4 cup of finely chopped toasted almonds or hazelnuts to the Oreo crust mixture for an added layer of texture and flavor.
- Make it Vegan: Use vegan cream cheese, vegan butter, and a plant-based heavy cream alternative (like coconut cream, chilled overnight, with the solid part scooped out) for a delicious dairy-free version. Ensure your Oreos are vegan-friendly (most are, but check the label).
- Gluten-Free Option: Simply use gluten-free chocolate sandwich cookies for the crust. The rest of the ingredients are typically gluten-free, but always check labels for hidden gluten.
- Individual Servings: Instead of a pie plate, press the crust into muffin tins lined with paper liners, then fill with the cheesecake mixture and chill for mini no-bake cheesecakes. Adjust chilling time accordingly.
Storage and Reheating
This No-Bake Black Forest Cheesecake Pie is best enjoyed chilled, and proper storage is key to maintaining its fresh taste and delightful texture. Once fully assembled and decorated, cover the pie loosely with plastic wrap or aluminum foil. Be careful not to let the wrap touch the whipped cream topping if you want to preserve its decorative swirls. Store the pie in the refrigerator for up to 3-4 days. The flavors tend to meld and deepen over time, making it almost better on the second day!
As this is a no-bake dessert, there is no reheating involved. It should always be served cold directly from the refrigerator. If you plan to serve it for a gathering, remove it from the fridge about 15-20 minutes before serving to allow it to soften just slightly, which can enhance the creamy texture, though it’s perfectly delicious served straight away too.
Freezing this cheesecake pie is also an option! To freeze, place the uncovered pie in the freezer for about 1-2 hours, or until it is firm to the touch. Once firm, wrap it tightly in several layers of plastic wrap, followed by a layer of aluminum foil. This double-layer protection helps prevent freezer burn. The pie can be stored in the freezer for up to 1 month. When you’re ready to enjoy it, transfer the frozen pie to the refrigerator and allow it to thaw overnight, or for at least 8-12 hours, before serving. You can then add fresh whipped cream and chocolate shavings if desired, as these might not hold up perfectly after freezing and thawing.
Frequently Asked Questions
Can I use a different type of chocolate for the filling and ganache?
Yes, absolutely! While semi-sweet chocolate is recommended for a balanced flavor that isn’t overly sweet, you can certainly experiment. For a richer, more intense chocolate flavor, use dark chocolate (60-70% cocoa solids). If you prefer a sweeter profile, milk chocolate can be used, though it might make the pie quite sweet. Just be aware that different chocolates have varying fat content, which can slightly affect the texture of the ganache; you might need to adjust the amount of cream slightly if it’s too thick or thin.
Why did my cheesecake filling turn out lumpy?
The most common reason for a lumpy cheesecake filling is not using room-temperature cream cheese. Cold cream cheese is stiff and will not beat smooth, leading to lumps even after extensive mixing. Always ensure your cream cheese has sat out on the counter for at least 1-2 hours (or longer, depending on your room temperature) until it’s very soft to the touch. Beating the cream cheese thoroughly on its own before adding other ingredients also helps ensure a smooth base.
My ganache is too thick/thin. How can I fix it?
If your ganache is too thick, it likely cooled too much or didn’t have enough liquid. You can gently reheat it over a very low heat or in short 10-second bursts in the microwave, stirring well after each, until it reaches the desired pourable consistency. If your ganache is too thin, it means it’s too warm or has too much liquid. Let it cool at room temperature for a bit longer, stirring occasionally, until it thickens up. If it’s still too thin, you can add a few more chocolate chips and let them melt in the warm ganache, then stir until smooth. Conversely, if it’s too thick, stir in a tiny bit more warm heavy cream, a teaspoon at a time, until it loosens up.
Can I make this pie ahead of time for a party?
Yes, this No-Bake Black Forest Cheesecake Pie is an excellent make-ahead dessert! In fact, it benefits from a longer chilling time, allowing the flavors to fully develop and the texture to firm up perfectly. You can prepare the entire pie, including the ganache, up to 2 days in advance and store it covered in the refrigerator. I recommend adding the chocolate whipped cream topping and chocolate shavings for garnish just a few hours before serving, as whipped cream can sometimes lose its stiffness over extended periods in the fridge.