Instructions
- Prepare the Base: In a large, chilled mixing bowl, combine the very cold heavy cream, cold sweetened condensed milk, vanilla extract, and optional fine sea salt. For best results, chill your mixing bowl and whisk attachment (if using a stand mixer) in the freezer for 10-15 minutes beforehand.
- Whip the Cream Mixture: Using an electric hand mixer or a stand mixer with the whisk attachment, beat the mixture on medium-high speed. Continue beating until stiff peaks form. This means when you lift the whisk, the peaks of the cream stand up firmly and hold their shape. Be careful not to over-whip, as it can separate.
- Prepare the Chocolate Swirl: In a microwave-safe bowl, combine the semi-sweet chocolate chips (or chopped chocolate) and 2 tablespoons of heavy cream or milk. Microwave in 30-second intervals, stirring well after each, until the chocolate is completely melted and smooth. Alternatively, melt over a double boiler. Let the chocolate mixture cool slightly to lukewarm, but ensure it remains pourable. If it cools too much and thickens, gently warm it again.
- Layer the Ice Cream: Spoon about one-third of the whipped cream base into a freezer-safe container (a loaf pan or a 9×5 inch pan works wonderfully).
- Add the First Swirl: Drizzle about one-third of the cooled melted chocolate over the cream base in the container.
- Create the Swirl Pattern: Using a butter knife, skewer, or the handle of a spoon, gently swirl the chocolate into the cream. Make broad, S-shaped motions or zigzags, being careful not to over-mix and fully incorporate the chocolate. The goal is distinct ribbons and swirls.
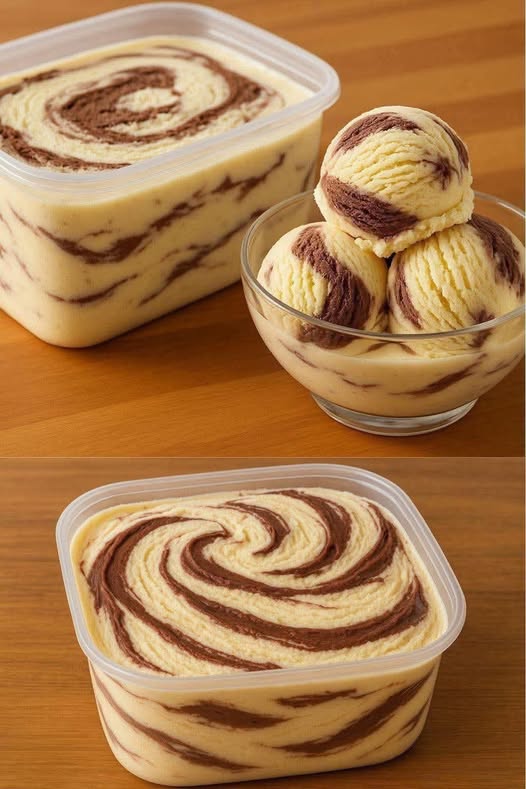
- Repeat Layering: Repeat steps 4, 5, and 6 two more times, layering another third of the cream base, drizzling with chocolate, and gently swirling. Finish with a final layer of cream and a final drizzle of chocolate, creating a beautiful swirl on top.
- Freeze for Perfection: Cover the container tightly with plastic wrap, pressing it directly onto the surface of the ice cream to prevent ice crystals. Then, cover with the lid of the container or aluminum foil.
- Chill: Place the ice cream in the freezer for at least 6-8 hours, or preferably overnight, until it is firm and scoopable.
- Serve: When ready to serve, remove the ice cream from the freezer and let it sit at room temperature for 5-10 minutes to soften slightly, making it easier to scoop. Enjoy!
Cooking Tips and Variations
For the Cream Base:
- Chill Your Tools: For the quickest and most stable whipped cream, place your mixing bowl and whisk attachment (if using a stand mixer) in the freezer for 10-15 minutes before you start. Cold equipment helps the cream whip up faster and hold its volume better.
- Don’t Over-Whip: Whip the cream mixture until it forms stiff peaks. This means when you lift the whisk, the peaks stand up firmly. Over-whipping can lead to a grainy texture, so keep a close eye on it.
- Use Full-Fat Heavy Cream: For the creamiest, most luxurious texture, always opt for full-fat heavy cream (at least 36% milk fat). Lower fat content won’t whip as well and can result in an icier ice cream.
For the Swirl:
- Cool the Chocolate: Ensure your melted chocolate swirl component has cooled to lukewarm before adding it to the whipped cream base. If it’s too hot, it will melt the delicate whipped cream, compromising the texture.
- Achieving the Perfect Swirl: The key to a beautiful swirl is gentle handling. Don’t over-swirl! A few broad, S-shaped or zigzag motions with a knife or skewer are all it takes. You want distinct ribbons of chocolate, not a fully incorporated brown ice cream.
- Adjust Swirl Consistency: If your melted chocolate seems too thick to drizzle easily, add another tiny splash of heavy cream or milk and stir until it reaches a pourable consistency.
Freezing & Storage:
- Prevent Ice Crystals: To avoid an icy texture, press plastic wrap directly onto the surface of the ice cream before covering the container with a lid or foil. This creates a barrier against freezer burn and ice crystal formation.
- Airtight Container is Key: Always use an airtight freezer-safe container. This protects the ice cream from absorbing freezer odors and helps maintain its creamy texture.
- Patience is a Virtue: Allow adequate freezing time – at least 6-8 hours, but preferably overnight. This ensures the ice cream is fully set and has the best scoopable consistency.
- Temper Before Scooping: For easier scooping and the best texture, let the ice cream sit at room temperature for 5-10 minutes before serving.
Customization Ideas:
- Other Swirl Flavors: Get creative with your swirl! Try a caramel sauce, a fruit puree (like raspberry or strawberry), or even a peanut butter swirl.
- Mix-Ins: After your final swirl, fold in your favorite mix-ins. Think chopped nuts, cookie pieces (Oreos, chocolate chip cookies), mini chocolate chips, or even chopped candy bars.
- Flavor Extracts: Experiment with different extracts in the cream base. Almond extract, peppermint extract, or coffee extract can add exciting new dimensions.
- Spice It Up: Add a pinch of cinnamon or chili powder to your chocolate swirl for a unique kick.
Troubleshooting:
- Too Icy? If your ice cream turns out too icy, it might be due to not enough fat (use full-fat cream), not enough sugar (ensure correct amount of condensed milk), or moisture from ice crystals. Adding a small amount of liquor (like vodka, 1-2 tablespoons) can lower the freezing point and help with creaminess, but use sparingly.
Storage and Reheating
Once your homemade swirled ice cream is frozen, it should be stored in an airtight freezer-safe container. To prevent freezer burn and the formation of ice crystals, press a layer of plastic wrap directly onto the surface of the ice cream before securing the lid. Stored properly, this no-churn ice cream will maintain its best quality for up to 2-3 weeks in the freezer. While it can last longer, its texture may degrade over time. There is no “reheating” for ice cream; simply remove it from the freezer and let it sit at room temperature for 5-10 minutes (or longer if it’s very hard) before scooping to achieve optimal creaminess.
Frequently Asked Questions
Can I make this ice cream without sweetened condensed milk?
Unfortunately, no. Sweetened condensed milk is a crucial ingredient in no-churn ice cream. Its high sugar content and thick consistency are what prevent the ice cream from freezing into a solid block of ice, giving it that wonderfully creamy, scoopable texture without the need for an ice cream maker.
Why did my ice cream turn out icy instead of creamy?
There are a few common reasons for icy no-churn ice cream. Ensure you used full-fat heavy cream and whipped it to stiff peaks – under-whipped cream won’t incorporate enough air. Also, make sure your container is airtight and you pressed plastic wrap directly onto the surface of the ice cream to prevent ice crystals from forming due to exposure to air in the freezer.
How long does it take for the ice cream to freeze completely?
For optimal firmness and scoopability, the ice cream should freeze for at least 6-8 hours. However, for the very best results, we recommend freezing it overnight (12-24 hours). This allows it to fully set and develop its perfect creamy texture.