Instructions
- Prepare the Crust: Preheat your oven to 350°F (175°C). In a medium bowl, combine the finely crushed chocolate sandwich cookies with the melted butter. Mix until well combined and the crumbs are moistened.
- Press the mixture firmly into the bottom of a 9-inch springform pan. Use the back of a spoon or the bottom of a glass to create an even, compact layer.
- Bake the crust for 8-10 minutes. Remove from oven and let cool completely on a wire rack while you prepare the filling. Reduce oven temperature to 325°F (160°C).
- Prepare for Water Bath (Optional but Recommended): Wrap the bottom and sides of the springform pan tightly with several layers of heavy-duty aluminum foil to prevent water from seeping in. This is crucial if using a water bath.
- Make the Cheesecake Filling: In a large bowl, using an electric mixer on medium speed, beat the softened cream cheese until smooth and creamy, about 2-3 minutes. Scrape down the sides of the bowl as needed.
- Gradually add the granulated sugar to the cream cheese, beating until well combined and fluffy, about 2-3 more minutes.
- Beat in the eggs one at a time, mixing well after each addition. Be careful not to overmix, as this can incorporate too much air and lead to cracks.
- Stir in the vanilla extract and sour cream until just combined.
- In a separate microwave-safe bowl, melt the semi-sweet chocolate chips in 30-second intervals, stirring after each, until smooth. Let cool slightly.
- Slowly pour the slightly cooled melted chocolate into the cream cheese mixture, beating on low speed until fully incorporated.
- Sift in the unsweetened cocoa powder and mix on low speed until no streaks remain. The batter should be smooth and uniform.
- Bake the Cheesecake: Pour the chocolate cheesecake filling evenly over the cooled chocolate cookie crust in the prepared springform pan.
- If using a water bath, place the foil-wrapped springform pan into a larger roasting pan. Carefully pour hot water into the roasting pan until it comes halfway up the sides of the springform pan.
- Carefully transfer the roasting pan with the cheesecake to the preheated oven.
- Bake for 60-75 minutes, or until the edges are set but the center still has a slight jiggle (about 2-3 inches in diameter).
- Cool the Cheesecake: Turn off the oven, crack the oven door open slightly, and leave the cheesecake inside for 1 hour. This slow cooling process helps prevent cracks.
- Carefully remove the cheesecake from the water bath (if used) and the roasting pan. Remove the foil. Let it cool completely on a wire rack at room temperature for another 1-2 hours.
- Once cooled to room temperature, cover the cheesecake loosely with plastic wrap and refrigerate for at least 6-8 hours, or preferably overnight, to allow it to set completely.
- Prepare the Chocolate Ganache Topping: Once the cheesecake is fully chilled, prepare the ganache. In a microwave-safe bowl, combine the semi-sweet chocolate chips and heavy cream.
- Microwave in 30-second intervals, stirring after each, until the chocolate is melted and the mixture is smooth. Stir in the softened butter until fully incorporated and glossy.
- Let the ganache cool slightly at room temperature for about 10-15 minutes, stirring occasionally, until it thickens just enough to be pourable but not too runny.
- Assemble and Garnish: Carefully remove the sides of the springform pan from the chilled cheesecake.
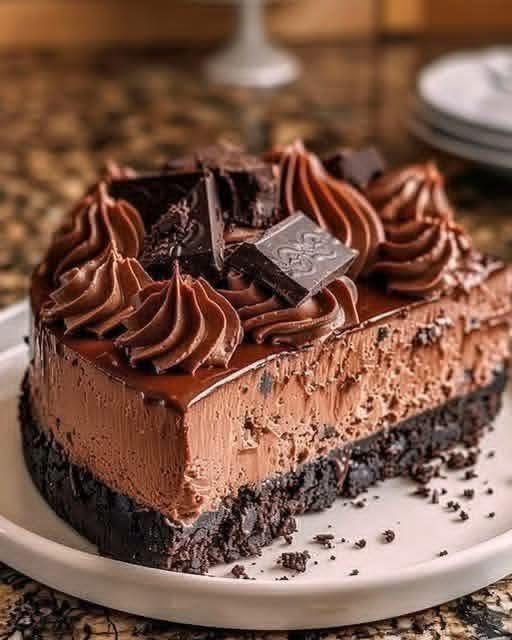
- Pour the slightly cooled ganache over the top of the cheesecake, gently spreading it out to the edges with an offset spatula or the back of a spoon. You can let some ganache drip down the sides for a rustic look.
- Return the cheesecake to the refrigerator for another 30 minutes to allow the ganache to set.
- Before serving, garnish with chocolate shavings, chocolate squares, or chocolate curls, if desired.
Cooking Tips and Variations
Achieving cheesecake perfection requires a few key techniques. First and foremost, ensure all your dairy ingredients – cream cheese, eggs, and sour cream – are at true room temperature. This is crucial for a smooth, lump-free batter that incorporates air evenly and bakes beautifully. Cold ingredients will result in a lumpy batter and a denser, less creamy cheesecake. When mixing the filling, be mindful not to overmix, especially after adding the eggs. Overmixing incorporates too much air, which can cause the cheesecake to puff up in the oven and then fall and crack as it cools. Mix until just combined and smooth.
The water bath, while an extra step, is a game-changer for cheesecake. It provides a moist, even cooking environment, preventing the edges from baking faster than the center and significantly reducing the risk of cracks. If you’re nervous about water leaking into your springform pan, use several layers of heavy-duty foil and ensure there are no gaps. Alternatively, you can use an oven bag designed for baking to completely encase the bottom of the pan. Slow cooling is another critical tip; leaving the cheesecake in the turned-off oven with the door ajar allows it to cool gradually, preventing a sudden temperature shock that can lead to cracking. Always chill your cheesecake for at least 6-8 hours, or overnight, before slicing. This allows it to fully set, making for cleaner cuts and a firmer, more enjoyable texture.
For variations, feel free to experiment with the types of chocolate. For a richer, more intense flavor, use dark chocolate (60-70% cocoa solids) in both the filling and ganache. If you prefer a sweeter profile, milk chocolate can be used, though it might make the cheesecake a bit softer. You can also add a tablespoon of espresso powder to the chocolate filling to deepen the chocolate flavor without making it taste like coffee. For an extra kick, a tablespoon or two of chocolate liqueur, Kahlúa, or Grand Marnier can be added to the filling or ganache. Consider adding a layer of raspberry preserves or a swirl of caramel on top of the cheesecake before adding the ganache for an additional flavor dimension. For a delightful texture contrast, you can fold in mini chocolate chips or chopped chocolate chunks into the filling just before pouring it into the crust. Garnish with fresh raspberries or strawberries for a beautiful color contrast and a hint of tartness.
Storage and Reheating
This Triple Chocolate Cheesecake stores beautifully, making it an excellent make-ahead dessert. Once the cheesecake is completely chilled and the ganache is set, cover it loosely but completely with plastic wrap or aluminum foil. Ensure the plastic wrap doesn’t stick directly to the ganache topping, or it might pull off some of the chocolate when removed. You can place toothpicks around the edge of the cheesecake before covering to create a small tent, preventing direct contact. Store the cheesecake in the refrigerator for up to 5 days. For longer storage, you can freeze individual slices or the entire cheesecake. To freeze, place the uncovered cheesecake in the freezer for about 1-2 hours, or until firm. Then, wrap it tightly in several layers of plastic wrap, followed by a layer of aluminum foil. This double wrapping helps prevent freezer burn. Frozen cheesecake can be stored for up to 1 month.
When you’re ready to enjoy a frozen cheesecake, transfer it to the refrigerator and let it thaw slowly overnight, or for at least 8-10 hours. Do not attempt to thaw it at room temperature, as this can affect its texture and lead to condensation. Cheesecake is best served chilled, so reheating is generally not recommended. If you desire a slightly softer ganache or topping, you can let a chilled slice sit at room temperature for 15-20 minutes before serving. To ensure clean slices when serving, always use a sharp knife that has been run under hot water and then wiped dry. Reheat the knife between each slice for the best results.
Frequently Asked Questions
How do I prevent my cheesecake from cracking?
Preventing cracks in cheesecake involves a few key steps: ensure all ingredients are at room temperature for a smooth batter, avoid overmixing the batter (especially after adding eggs) to prevent excess air incorporation, use a water bath during baking to provide a moist, even cooking environment, and allow the cheesecake to cool slowly in the turned-off oven with the door ajar before transferring to the refrigerator. Rapid temperature changes are a common cause of cracks.
Can I make this cheesecake ahead of time?
Absolutely! Cheesecake is an excellent make-ahead dessert. In fact, it tastes even better the next day as the flavors have more time to meld and the texture fully sets. You can prepare the entire cheesecake, including the ganache topping, up to 2-3 days in advance. Just ensure it’s properly covered and stored in the refrigerator until serving.
What kind of chocolate should I use for the best flavor?
For the best flavor, use high-quality semi-sweet chocolate chips or baking chocolate for both the filling and the ganache. A good quality chocolate will melt smoothly and provide a rich, deep chocolate taste. While milk chocolate can be used for a sweeter profile, it may result in a slightly softer cheesecake. Dark chocolate (60-70% cocoa) can be used for a more intense, less sweet flavor if preferred.
How do I get clean slices of cheesecake?
For perfectly clean slices, ensure your cheesecake is thoroughly chilled, ideally overnight. Before each slice, run a sharp, thin-bladed knife under hot water for a few seconds, then wipe it completely dry. The warm, dry knife will glide through the cheesecake and ganache without sticking, creating crisp, clean cuts. Repeat this process for every slice.