Instructions
- Prepare the Dough (Détrempe): In a large mixing bowl, combine the flour, sugar, yeast, and salt. Whisk briefly to combine.
- Add the cold milk and cold water to the dry ingredients. Mix with a spoon or your hands until a shaggy dough forms.
- Turn the dough out onto a lightly floured surface. Knead gently for 5-7 minutes, just until the dough comes together and is smooth, but not overly elastic. Avoid over-kneading, as we want to develop gluten slowly.
- Form the dough into a rectangular shape, about 6×8 inches. Wrap tightly with plastic wrap and refrigerate for at least 2 hours, or preferably overnight. This chilling period is crucial for relaxing the gluten and preparing the dough for lamination.
- Prepare the Butter Block (Beurrage): Take the 250g of very cold unsalted butter. Place it between two sheets of parchment paper.
- Using a rolling pin, pound and roll the butter into a flat, even rectangle, approximately 8×8 inches. The butter should be pliable but still very cold. If it becomes too soft, refrigerate it for a few minutes.
- First Fold (Single Fold): Remove the dough from the refrigerator. On a lightly floured surface, roll the dough into a rectangle roughly 16×9 inches. It should be twice as long as your butter block and slightly wider.
- Place the butter block on one half of the rolled-out dough, leaving a 1-inch border around the edges.
- Fold the other half of the dough over the butter block, carefully sealing the edges to encase the butter completely. Ensure no butter is exposed.
- Rotate the dough 90 degrees so the seam is on your right. Gently roll the dough into a rectangle about 24×9 inches.
- Perform a single fold: Fold the bottom third of the dough up to the center, then fold the top third down over the bottom third, like a letter. This creates three layers.
- Wrap the dough tightly in plastic wrap and refrigerate for 30 minutes.
- Second Fold (Single Fold): Remove the dough from the refrigerator. Place it on a lightly floured surface with the seam on your right.
- Roll the dough again into a rectangle approximately 24×9 inches.
- Perform another single fold (bottom third up, top third down).
- Wrap the dough tightly and refrigerate for another 30 minutes.
- Third Fold (Single Fold): Remove the dough from the refrigerator. Place it on a lightly floured surface with the seam on your right.
- Roll the dough one last time into a rectangle approximately 24×9 inches.
- Perform the final single fold. You have now completed three single folds.
- Wrap the dough tightly and refrigerate for at least 1 hour, or up to 24 hours. This final chill is essential for the butter to firm up and the gluten to relax completely.
- Shaping the Croissants: Remove the dough from the refrigerator. On a lightly floured surface, roll the dough into a large rectangle, about 20×10 inches and approximately 1/8 inch thick. Aim for even thickness.
- Trim the edges of the dough to create clean, straight lines.
- Using a ruler and a sharp knife or pizza cutter, cut the dough into long triangles. Start by cutting the rectangle in half lengthwise. Then, cut triangles with a base of about 4-5 inches. You should get about 10-12 triangles.
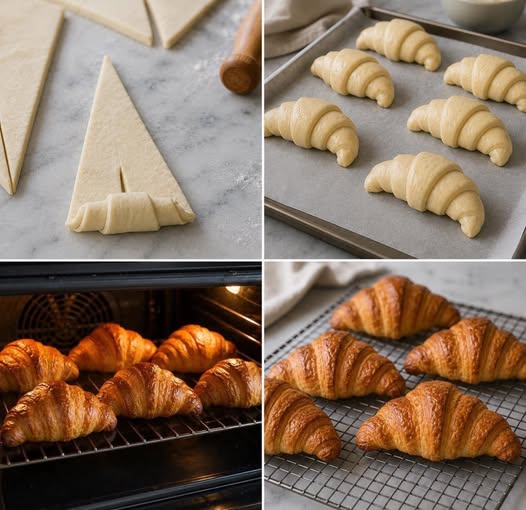
- Starting from the wide base of each triangle, gently but firmly roll the dough towards the tip. Try to keep the roll tight and even.
- Once rolled, gently curve the ends of each croissant inwards to form the classic crescent shape.
- Proofing: Line two baking sheets with parchment paper. Place the shaped croissants on the prepared baking sheets, leaving ample space between them as they will expand significantly.
- Cover the baking sheets loosely with plastic wrap or a clean kitchen towel.
- Proof the croissants in a warm, draft-free place for 2-3 hours, or until they have nearly doubled in size and are noticeably puffy and jiggly. A good test is to gently jiggle the tray; the croissants should wobble slightly. The layers should also be visible.
- Baking: Preheat your oven to 400°F (200°C) with a rack in the middle position.
- Just before baking, gently brush the tops of the proofed croissants with the beaten egg wash. Be careful not to deflate them.
- Bake for 15-20 minutes, or until the croissants are deep golden brown, puffed, and flaky. Rotate the baking sheets halfway through baking for even browning.
- Remove from the oven and transfer the croissants to a wire rack to cool slightly before serving.
Cooking Tips and Variations
Use High-Quality Butter: The quality of your butter directly impacts the flavor and flakiness of your croissants. Opt for a European-style butter with a higher fat content (around 82% butterfat) for superior results. Its pliability and richness are unmatched.
Keep Everything Cold: This is the golden rule of croissant making. Cold dough and cold butter prevent the butter from melting into the dough, which would result in a bready rather than flaky texture. Work quickly and don’t hesitate to pop the dough back into the fridge if it feels warm or sticky.
Patience with Lamination: Rushing the folding and chilling steps is the most common mistake. Allow ample resting time between each fold to relax the gluten in the dough. This makes it easier to roll without tearing and ensures distinct layers.
Gentle Rolling: When rolling out the dough, apply even pressure. Avoid pressing down too hard, which can squeeze the butter out of the layers. Use light, even strokes, and rotate the dough frequently to maintain its rectangular shape.
Proper Proofing: Proofing is critical for the croissant’s final texture. If under-proofed, they will be dense. If over-proofed, they may collapse in the oven. Look for a significant increase in size, a delicate wobble when gently shaken, and visible layers. The ideal proofing environment is warm and humid (e.g., in a turned-off oven with a pan of hot water).
Egg Wash Application: Apply the egg wash gently to avoid deflating the proofed croissants. Don’t let the egg wash drip down onto the cut edges, as this can seal the layers and prevent them from rising properly.
Variations:
- Pain au Chocolat: Before rolling, place two sticks of dark chocolate (bâtons de chocolat) at the wide end of the triangle. Roll them up as usual.
- Almond Croissants: After baking, slice cooled croissants horizontally. Fill with a frangipane (almond cream) filling, brush with simple syrup, sprinkle with sliced almonds, and bake again until golden. Dust with powdered sugar.
- Ham and Cheese Croissants: Before rolling, place a slice of ham and a sprinkle of Gruyere or Swiss cheese at the wide end of the triangle.
- Sweet Fillings: Experiment with fruit preserves, Nutella, or pastry cream added before rolling.
Storage and Reheating
Freshly Baked: Croissants are best enjoyed on the day they are baked, ideally still warm from the oven. Their crispness and flakiness are at their peak then.
Storing Day-Old Croissants: If you have leftover baked croissants, store them at room temperature in an airtight container or a paper bag (to maintain some crispness) for up to 1-2 days. They will lose some of their initial crispness but will still be delicious.
Freezing Baked Croissants: For longer storage, allow baked croissants to cool completely. Place them in a single layer on a baking sheet and freeze until solid. Once frozen, transfer them to a freezer-safe bag or airtight container. They can be stored for up to 1 month.
Reheating Baked Croissants:
- From Room Temperature: Preheat your oven to 350°F (175°C). Place the croissants directly on a baking sheet and heat for 5-7 minutes, or until warmed through and the exterior is crisp again.
- From Frozen: Do not thaw. Preheat your oven to 350°F (175°C). Place frozen croissants on a baking sheet and heat for 10-15 minutes, or until warmed through and crisp.
Freezing Unbaked Croissants: You can also freeze shaped but unbaked croissants. After shaping, arrange them on a baking sheet and freeze until solid. Transfer to a freezer-safe bag. When ready to bake, place them on a parchment-lined baking sheet and let them proof at room temperature until doubled in size (this will take longer than fresh proofing, potentially 4-6 hours or even overnight in the fridge, followed by an hour at room temperature). Then egg wash and bake as directed.
Frequently Asked Questions
Why is my croissant dough tearing during rolling?
Dough tearing usually indicates that the gluten hasn’t relaxed enough, or the butter block is too cold and rigid. Ensure you’re giving the dough adequate resting time in the refrigerator between folds. If the butter is too hard, let it sit out for a few minutes to soften slightly, but don’t let it become oily. Gentle, even pressure during rolling is also key.
My croissants didn’t get flaky; they’re more bready. What went wrong?
This is a common issue and almost always points back to the butter. Either the butter melted into the dough during lamination (meaning your dough or butter was too warm, or you worked too slowly), or the butter layers weren’t distinct enough due to improper folding or over-rolling. The cold temperature and distinct layers of butter are essential for creating steam during baking, which separates the dough into those desired flaky layers.
How do I know if my croissants are properly proofed?
Proper proofing is crucial. A well-proofed croissant will have nearly doubled in size, feel very light and airy, and when gently jiggled, it will wobble slightly. You should also be able to see the distinct layers of dough on the sides. If you gently poke it with a floured finger, the indentation should slowly spring back. If it springs back immediately, it needs more time; if it collapses, it’s over-proofed.
Can I make the dough ahead of time?
Absolutely! The dough can be prepared up to the final fold and refrigerated for up to 24-48 hours before shaping. This extended cold rest can even improve the flavor. You can also freeze the shaped, unbaked croissants as described in the storage section, allowing you to bake fresh croissants whenever the craving strikes.